


What is Injection Molding?
A Comprehensive Overview
Injection molding (also known as the injection molding process) is one of the most widely used manufacturing methods for producing plastic parts in large volumes. It offers a fast, cost-effective, and highly repeatable method for creating complex shapes and highly detailed components across industries such as automotive, consumer electronics, medical devices, packaging, and household goods.
This article explores injection molding from fundamental principles to advanced considerations in design, material selection, and production optimization.
Definition of Injection Molding
Injection molding is a manufacturing technique that involves melting thermoplastic or thermosetting polymers and injecting them into a precision-designed mold cavity. Once the molten material cools and solidifies, it takes the shape of the mold, forming a finished part that requires minimal post-processing.
The process consists of several core stages:
- Clamping – The two halves of the mold are securely closed.
- Injection – Molten plastic is injected into the mold at high pressure.
- Cooling – The material cools and solidifies inside the mold.
- Ejection – The molded part is ejected from the mold.
Injection molding machines typically consist of three units: the injection unit, the mold (tooling), and the clamping unit.
History and Evolution of Injection Molding
- 1872: The first injection molding machine was patented by John Wesley Hyatt and Isaiah Hyatt, originally designed for celluloid.
- 1940s: Widespread use expanded due to war-time demand for mass-produced plastic parts.
- 1950s–1970s: Development of advanced thermoplastics and automated machines revolutionized efficiency.
- Today: Injection molding integrates with Industry 4.0 technologies, including sensors, real-time monitoring, and AI-based quality control.
Plastic injection molding represents a widely adopted manufacturing technique that transforms thermoplastic pellets into vast quantities of intricate parts. The injection molding process is suitable for various plastic materials and is pivotal in modern existence. Phone cases, electronic housings, toys, and even automotive components owe their existence to this technology.
Injection molding process-Fundamentals of Plastic Injection Molding
The basics of the injection molding process entail designing the product, fabricating a mold tailored to the design, melting plastic resin pellets, and utilizing pressure to inject the molten material into the mold.
The breakdown of each step follows:
Designing the Product
Designers, such as engineers or mold maker businesses, create a part in the form of a CAD file or another transferable format, adhering to fundamental design guidelines specific to injection molding. To enhance the success of a plastic injection mold, designers should endeavour to incorporate the following features in their designs:
• Bosses for threaded inserts/fasteners.
• Constant or near-constant wall thicknesses.
• Smooth transitions between variable wall thicknesses.
• Hollow cavities in thick sections.
• Rounded edges.
• Draft angles on vertical walls.
• Ribs for support.
• Friction fits, snap-fit joints, and other non-fastener joining features.
• Living hinges.
Additionally, designers should minimize the following features to mitigate defects in their designs:
• Non-uniform wall thicknesses or excessively thin/thick walls.
• Vertical walls lacking draft angles.
• Sudden geometrical changes (corners, holes, etc.).
• Poorly designed ribbing.
• Undercuts/overhangs.

Fabricating a Mold Aligned with the Product Design
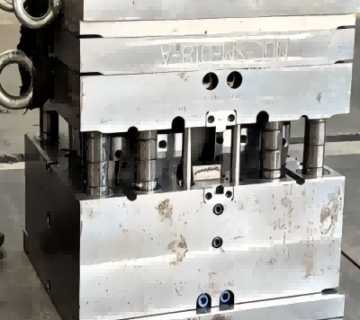
Highly skilled machinists and toolmakers employ product design to manufacture a mold for the injection molding machine. The tooling mold, the core component of the injection molding machine, is meticulously crafted to encompass the negative cavity conforming to the product design. Additionally, it incorporates supplementary features such as sprues, runners, gates, vents, ejector systems, cooling channels, and movable components. Tooling molds are composed of specific steel and aluminum grades capable of enduring tens of thousands, or even hundreds of thousands, of heating and cooling cycles. Examples of such materials include 6063 aluminium, P20 steel, H13 steel, and 420 stainless steel. The fabrication process of the mold, encompassing both fabrication and approval, spans over 20 weeks, rendering it the most time-consuming aspect of injection molding. Moreover, it represents the most costly phase and any substantial modifications to the tooling mold incur additional expenses.
Melting the Plastic Resin Pellets
Upon obtaining the completed mold, operators insert it into the injection molding machine, initiating the injection molding cycle.
Plastic granules are fed into the hopper and subsequently into the barrel. The reciprocating screw withdraws, enabling the material to fill the space between the screw and the barrel. The screw then moves forward, propelling the material into the barrel and closer to the heater bands, where it liquefies into molten plastic. The temperature is meticulously maintained based on the material specifications to prevent the barrel’s or mold’s degradation.
Utilizing Pressure to Inject the Molten Pellets Into the Mold
The reciprocating screw propels the molten plastic through the nozzle, which is seated within a depression in the mold known as a mold sprue bushing. The moving platen applies pressure to fit the mold tightly and the nozzle, preventing any plastic from escaping. This process pressurises the molten plastic, compelling it to permeate every part of the mold cavity and expelling air from the cavity through mold vents.
Key Components of an Injection Molding Machine

An injection molding machine is composed of several critical components that work together to transform raw plastic into finished parts with precision and efficiency. Below is an overview of each major component:
- Hopper: The entry point for plastic granules, feeding material into the barrel.
- Barrel: A cylindrical housing that encloses the reciprocating screw and granules. It is equipped with multiple heating bands and terminates with a heated nozzle.
- Reciprocating Screw: A helical screw that conveys, melts, and pressurizes the plastic material as it moves through the barrel.
- Heaters: Also known as heating bands, these elements apply thermal energy to the plastic, enabling its transition from solid to molten state.
- Movable Platen: The moving plate attached to the mold core. It ensures a tight seal during injection and retracts to release the molded part upon cooling.
- Nozzle: A temperature-controlled outlet that directs molten plastic from the barrel into the mold cavity with consistent pressure and heat.
- Mold: A precision-engineered tool made from hardened steel or aluminum. It contains the mold cavity and other features such as runners, gates, and vents, shaping the final component.
- Mold Cavity: The hollow section within the mold that defines the geometry of the final part. Molten plastic fills this space and solidifies to form the finished product.
Injection Molding Process: Step by Step
The plastic injection molding process is a highly controlled, cyclic manufacturing method used to produce high volumes of precision plastic components. Below is a step-by-step overview of the standard process:
- Material Preparation
The process begins with thermoplastic material, typically in the form of granules or pellets, being loaded into a hopper. These raw materials may include additives such as colorants or stabilizers, depending on the product requirements. - Melting and Plasticizing
From the hopper, the plastic granules are fed into a heated barrel, where they are gradually melted by the combined action of external heater bands and the rotational shear of a reciprocating screw. The screw mixes and homogenizes the molten material to ensure consistency and proper viscosity. - Injection into the Mould
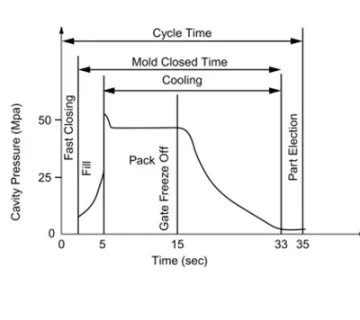
Once the plastic reaches the required temperature and viscosity, it is injected at high pressure into a precision-engineered mold cavity. The injection phase must be carefully timed and controlled to ensure complete cavity filling and minimize defects. - Cooling and Solidification
After injection, the mold remains closed, while the plastic cools and solidifies. The cooling time depends on the part’s material, geometry, and wall thickness. Cooling is typically managed using water channels embedded within the molding. - Mould Opening and Part Ejection
Once the part has fully solidified, the mould opens, and ejector pins or plates push the finished component out of the mould. In some cases, air blasts or stripper plates may assist the ejection process. The mold then closes again to begin the next cycle. - Post-Processing and Inspection
Depending on the application, the molded part may undergo secondary operations such as trimming, machining, surface finishing, or assembly. Final inspection ensures that dimensional accuracy and quality standards are met before the part proceeds to packaging or further integration.
Types of Injection Molding
Thermoplastic Injection Molding
The most widely used method, ideal for resins such as ABS, polypropylene (PP), and polycarbonate (PC). It allows for re-melting and reprocessing of the material.
Thermoset Injection Molding
Used to create parts that undergo a chemical reaction during molding and cannot be re-melted, offering excellent heat and chemical resistance.
Overmolding
A process that molds one material over another—commonly used to add soft-touch layers, color contrast, or additional functionality.
Insert Molding
Combines plastic with pre-placed inserts, such as metal components, to enhance mechanical strength or conductivity within a single molded part.
Liquid Silicone Rubber (LSR) Molding
A specialized technique for producing flexible, durable components used in medical, food-grade, and high-performance applications.
Material Selection in Injection Molding
Selecting the right material is critical to product performance and manufacturing success. Key factors to consider include:
- Mechanical properties
- Chemical resistance
- Thermal stability
- Regulatory compliance (e.g., FDA, RoHS)
- Aesthetic requirements
Common Thermoplastics:
ABS, Polypropylene (PP), Polycarbonate (PC), Nylon (PA), Acetal (POM), Acrylic (PMMA), PET, TPE/TPR.
Specialty Materials:
PEEK, PPSU, and Liquid Silicone Rubber (LSR) are used for high-performance applications, such as extreme environments or medical-grade requirements.
(Refer to the previous section for a complete breakdown of material properties.)
Applications of Injection Molding
Injection molding is widely used across various industries due to its efficiency, precision, and scalability. Key application areas include:
Automotive
Used for components such as dashboards, electrical connectors, housings, clips, and interior trim parts.
Consumer Products
Includes items like storage containers, appliance parts, handles, and plastic toys.
Medical Devices
Utilized for producing syringes, diagnostic components, enclosures, and implantable parts using biocompatible and medical-grade materials.
Electronics
Covers products such as mobile phone casings, cable insulation, plugs, and switch housings.
Packaging
Ideal for high-volume production of lids, closures, trays, and custom containers.



No comment