The Need to Measure Surface Texture
Measurement and comprehension of surface texture is essential, as the texture of a material not only affects the way a product looks and feels but how it performs. With irregularities in surface texture, factors like adhesion, friction, corrosion, heat transfer, wear, efficiency, and performance can be impacted. Understanding surface texture is crucial for process control and size control.
Surface texture is often described through three terms, which act as components of the real surface (the actual boundary of an object), and ASME B46.1-2019 defines these as:
Lay: “the predominant direction of the surface pattern.” Lay is ordinarily determined by the production method used.
Roughness: “the finer spaced irregularities of the surface texture.”
Waviness: “the more widely spaced component of the surface texture.” Waviness may be caused by various factors, such as machine or workpiece deflections, vibration, and chatter.
Breakdown of ASME B46.1-2019
As it is concerned with the geometric irregularities of surfaces, ASME B46.1-2019 is an expansive document. Overall, it defines surface texture and its constituents (roughness, waviness, and lay), as well as parameters for specifying surface texture.
With this focus, the applicability of the standard is broad. According to the American Society of Mechanical Engineers (ASME), ASME B46.1-2019 is intended for design, drafting, mechanical, manufacturing, production, tool/gage, quality, process and project engineers, CAD/CAM/CAE specialists, inspectors and educators across a broad range of global manufacturing. It also places a special emphasis on aerospace, automotive, medical device, precision instrumentation, and related industries.
Plastic Surface Finish
Surface roughness is the measure if the finer surface irregularities in the surface texture. These are the result of the manufacturing process employed to create the surface. Surface roughness Ra is rated as the arithmetic average deviation of the surface valleys and peaks expressed in microinches or micrometers. ISO standards use the term CLA (Center Line Average). Both are interpreted identical.
The ability of a manufacturing operation to produce a specific surface roughness depends on many factors. For example, in end mill cutting, the final surface depends on the rotational speed of the end mill cutter, the velocity of the traverse, the rate of feed, the amount and type of lubrication at the point of cutting, and the mechanical properties of the piece being machined. A small change in any of the above factors can have a significant effect on the surface produced.
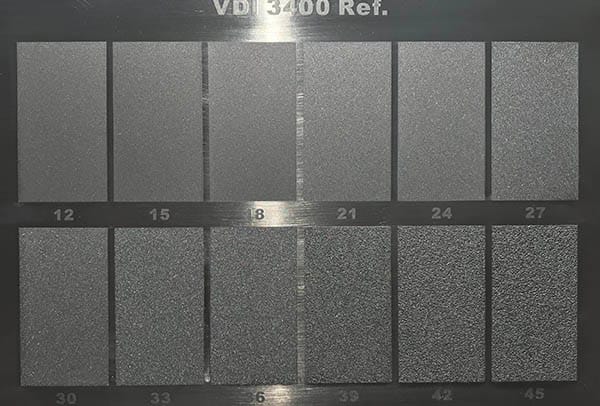
VDI 3400 Surface Finish (also known as VDI surface finish) refers to VDI 3400 texture. It refers to the texture standard set by Verein Deutscher Ingenieure (VDI), the Society of German Engineers. The VDI 3400 surface finish is mainly processed by Electrical Discharge Machining (EDM) when mold machining. It could also be done by the traditional texturing method.
All plastic injection molded parts have a surface texture created by the tools that made them. To get the surface finish and texture that you want from injection molding, it’s important for you to learn how we make and measure such finishes in our inspection department.








No comment